The fury and fun around photobooths really took off around the time of our wedding in the summer of 2007. We had quite a few friends rent traditional photobooths or had their photographers creating their own version at their receptions for all of their guests. Ever since, I’ve been fascinated with the idea of simply creating one for use in our own home whenever we wanted. And with the first birthday of our daughter approaching, I finalized everything I needed for the task!
Yep, that’s right, I DIY’d my own photobooth! Trust me, it’s really quite simple, and if you’re a super geek you might just have all of the parts lying around your house ready to go! And even if you don’t have spare parts, you can “borrow” your own components to use for your special day!
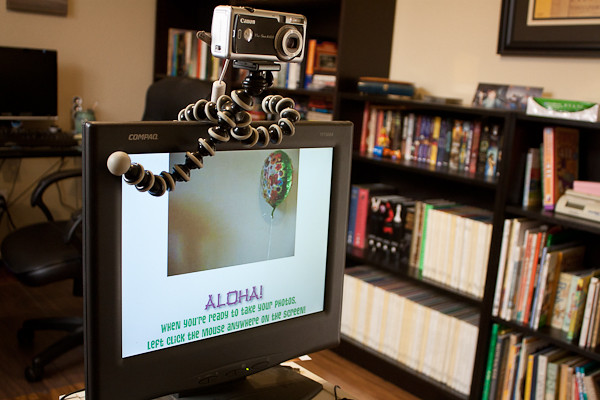
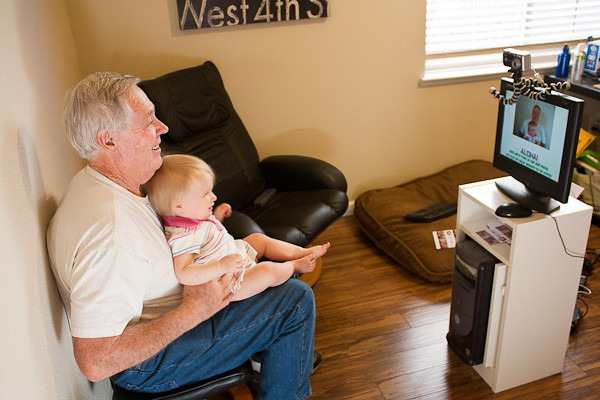
Here’s what my home set-up consists of:

Ingredients:
- Canon A400 powershot (bought this one on eBay for $10) with all cords (you just need any compatible Canon Powershot camera)
- Gorrilapod tripod ($20)
- Old LCD monitor (from college computer)
- mouse & keyboard (hidden from view)
- Canon PIXMA mini260 photo printer (got this for $25 at Fry’s a couple years ago)
- Old CPU – previous computer that’s been wiped clean
- powerstrip (for all the fun plugs in the back)
- Breeze Systems PSRemote software ($95)
- Old sidetable (to house everything)
So here’s the magic behind this lovely system. The software, PSRemote, made by Breeze Systems allows your computer to control your Canon Powershot camera (check here for the list of compatible cameras and Windows OS) remotely and you can easily set-up a photobooth in minutes! Just gather all of the ingredients, click what settings you want on the software, and you’re ready to go! (The Nikon version can be found here) Don’t have a Powershot camera? Don’t fret! They also make software for dSLRs (see the compatible list here) called DSLR RemotePro!
STEPS to create your photobooth:
1) Find a monitor, CPU, keyboard and mouse to use for your photobooth. Connect everything and install PSRemote.
2) Design your custom photobooth screens! Take note of the dimensions of your screen, and create a series of JPGs in your graphics editing program for the following screens:
ready.jpg – this is your “waiting for the next person” screen, so customize it with a friendly greeting and the instructions on what to do next!
1.jpg, 2.jpg, 3.jpg, 4.jpg – These are your countdown images that go along with the “active countdown timer.” 1.jpg is displayed during the countdown before taking the first picture, 2.jpg is displayed before taking the second picture etc.
taking.jpg – this is displayed a couple of seconds before taking each picture
release.jpg – optional image displayed when the instruction to take the picture is sent to the camera approximately 1 second before the picture is actually taken. The live view on most cameras will freeze just before the camera takes the picture and this can confuse some users. To avoid this, the software will automatically hide the live view display if a release.jpg image is defined.
processing.jpg – this is displayed after the last picture has been taken while the images are being prepared for printing. This screen could display a message like “All finished! Please collect your prints outside”.
When the prints have been formatted and sent to the printer the ready.jpg image is displayed again.
Upload these images to your photobooth computer.
3) Find a place to position your camera. Connect the camera to the USB port on the computer and make sure it is in playback mode. Turn the camera on!
4) Open up PSRemote and click on “File –> Photobooth Settings.” Go ahead and select all of the options that you’d like for your photobooth.

I definitely suggest changing the Output to “print and save JPG” so that you keep a copy of all the individual images and prints on your computer. For help with additional layout suggestions, click here.
5) TAKE YOUR FIRST PHOTOS! Check and adjust all the settings until you like the flow of everything!
6) If you want a custom logo to be printed on your photos… here’s what you need to do! Select “save as JPG” from the Output options. Then, use that print example file as your template for designing your logo. Design it in your editing program, then erase everything but the logo! Save it as “background.jpg” and make sure PSRemote knows where to find it in the settings box. Now, when your photos print, they’ll have this wonderful logo on them as well!
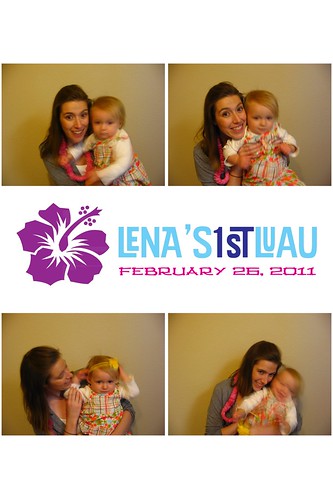
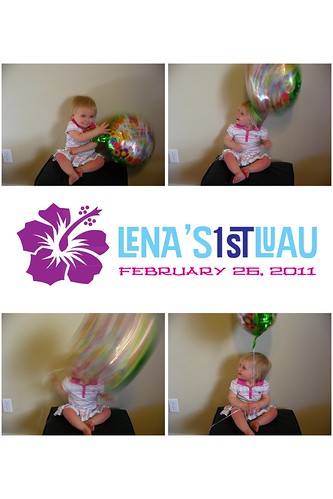
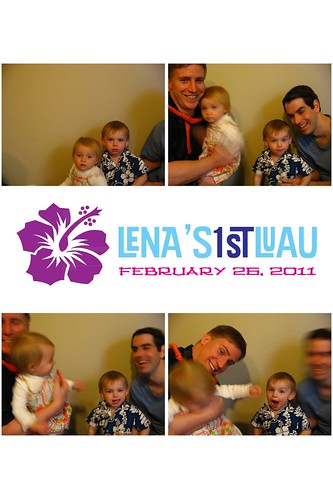
Now for our party set-up, I went ahead and customized all of the screens with special messages and also designed a logo for the printouts. All of this was done in about 30 minutes using Photoshop and made the experience that much better!
Here’s a small video showing you the photobooth in action:
And the end result?

For any and all help in making PSRemote work to its best capacity, check out the full online manual. Have a blast with your DIY’d photobooth!